Wednesday, 24 April 2013

I'm back! + Inspiring Artist: Katherine Tromans

Before I start, I just want to acknowledge that today is a very important day in Australian history, today, on ANZAC day, we remember those men and women who have risked and lay down their lives for their country and for all of us in wars throughout our history.

Lest we forget.


SO, I have returned from my little break! I'm rested and ready to get blogging! Over the next little while I am going to do a bit of makeovering in my bedroom....and when I am finished I will FINALLY do that next post on living on a budget, Decor! I'm so sorry for the wait on that one! Unacceptable. Really, I know.

Anywho, now that I am back, I've been back on my Pinterest (yes, I can't help myself) and via that lovely little nook of the internet I discovered myself a very talented artist: Katherine Tromans. (See her website and all her creative creations on her website)


Now, I just love watercolour, whether I'm using it or looking at a watercolour painting, and I love pastel colours, and I also adore nature so naturally, when I see these combined, I get a little high.

Katherine is an illustrator and graphic designer from Birmingham in the UK. This particular collection of hers, deemed "Paradise", is a series in which she explored the theme of paradise, taking people's descriptions of their own personal paradise and interpreting them in to these beautiful, otherworldly little pieces of prettiness:


Click to enlarge image katherinetromans_2_20130211_1170607869.jpeg


Click to enlarge image katherinetromans_3_20130211_1410290072.jpeg


Click to enlarge image katherinetromans_6_20130211_1085289012.jpeg


Click to enlarge image katherinetromans_9_20130211_1316008430.jpeg
ALL images exhibited here are created by artist Katherine Tromans, and all copyright belongs to her.


That's all for today!


Have a lovely day, God bless!


Annabelle


<3


xxx

Tuesday, 9 April 2013

Time for a break!


Oh hello!


Just to let you all know that there will not be any new posts for two weeks from today.
I am tired, and I need a break to look after myself!


I just want to thank everyone who has supported me by visiting this blog. Since January 27 we have had 2633 views, and the rates just keep speeding up! You guys have been just fantastic, and I really appreciate all you have done to help me! I can only hope that I have repaid you in enjoyable blog posts!

Please feel free to provide feedback and any requests you have for the blog by emailing me at annabelle_1995@hotmail.com.au, or posting them to our Facebook wall (right after you "like" us ;) )


Thanks again everybody, and I'll see you in two weeks!!


Love!


Annabelle


<3


xxx

Saturday, 6 April 2013

Flower girl.


I went to my gorgeous cousin's wedding yesterday, and this is what  put together for the day. 100% thrifted. Shyeah.


~ Dress, Friends of Couture (thrifted), $7
~ Belt, thrifted, $2
~ Bag, thrifted, $8
~ Shoes, $2, thrifted
~ Lipstick Revlon "Rum raisin"


And here's some shots i took at the ceremony!


Congratulations guys!!


Annabelle


<3


xxx

Thursday, 4 April 2013

Inspiring Artist: Alphonse Mucha.

At the start of the year, I was wondering around town with my mother, looking for a calendar. I came across a really stunning one, full of art by an artist I'd never heard of before. Whoever put the calendar together added sparkles for accents (which, with my obsession with sparkles, I just couldn't pass it up).

A couple of days ago I was on Pinterest and saw an image someone had pinned that looked like it was from my calendar, and lo, my love for Alphonse Mucha was born.

Mucha lived and made art from the mid 1800's to early 1900's, and I'm so glad he did, because his work is just beautiful! Check it out:


Champagne Printer Publisher - Alphonse Mucha
(image source)


(Image source)


(Image source)


(Image source)


(Image source)


(All works shown here by artist Alphonse Mucha)


That's all for now folks!


Annabelle


<3


xxx


Tuesday, 2 April 2013

DIY: Simple Bookbinding - Make Your Own Notebook! ( + my travel diary!)


So, I needed a travel diary. I adventure to Typo. I find a gorgeous little travel journal, I pick it up and skim through the pages. I smile. I turn it over and look at the price tag. I am appalled! I put it back out, and leave the store immediately.

There is nothing I like on Ebay.


There is nothing I fancy on Etsy.


Even Amazon fails me.


This left me with no other choice.....


I must make one myself.


And this is how I did it!


You're gonna need:


~ Something to use as a cover. I made this myself with a piece of cardboard I found and covered with vintage wallpaper that I already had. You can use a manila folder, old book covers, or you can do what I did and find a piece of cardboard and either leave it plain or cover it with fabric, paper, wallpaper or whatever you take a liking to.
~ Thread and a needle with an eye big enough to fit the thread through. (TIP: lick the end of the thread and squeeze it flat to fit it through the eye of the needle.
~ Something to use as an awl (which is a bookbinding tool). So basically, something strong and pointy to poke small holes with. Kay?
~ Paper
~ Scissors
~ A pencil.
 
Alrighty, so you got your stuff? Let's go!


Step 1


Decide on how many pages you want, and then half that number and fetch that many pieces of paper. I wanted 24 pages, so I got 12 pieces of paper. Put all these pieces together and fold evenly. You want the fold to be sure of itself, so grab a bone folder or a knife or ruler, and use the back of it to get that fold nice and...uh...folded. Not just curved.


Step 2


Put your paper flat on your open cover, and position it so the fold in your paper aligns with the fold in the cover. Grab your pencil and mark where the holes are going to go on the paper. I did mine about an inch apart all the way down. Hey look! I got a text message!


Step 3


Now it's time to poke some holes! Get your sharp pokey thing and make a hole in each dot.


Step 4


Place your pages on your cover like you did before. Making sure your pencil is sharp, put the point in each of the holes in the paper to mark where the holes will be on the cardboard. Clever, huh! You also want holes right at the edge of the paper on the cover as well, so mark there too, like I am in this picture. Then poke your holes like you did last time!


Step 5


Cut a length of thread, tie a knot at the end, and thread it through your needle (remember my tip from earlier in this post!)


Step 6


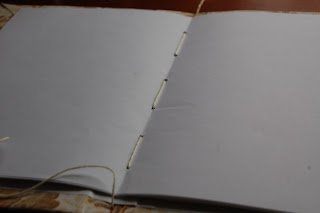
Now for the fun part, let's sew! Okay so, to start, poke your needle through the first hole at the top of the paper in the cover, and pull the thread through until your knot catches. Now, come back up through the next hole, and pull tight. Then go down through the next hole, and pull tight, and up through the next and so on until you reach the end like this:


Now, we do the same thing again but coming back up the other way. So, down through the next hole, pull tight, up through the next, pull tight.


Step 7


When you reach the end, make sure that everything is pulled tight and your pages are secure. Now we want to tie off our thread. To do this we take our needle down through the first hole where the knot is, and bring it back up through the next hole. Pull your thread through, tie it off with the tail of the knot at the hole with a good, strong triple knot. You can even dab a bit of glue on it to be extra sure. Then snip off the excess string and.....


 Voila!


You have a book!


Now, if you want a button and string clasp like I have on mine (see in picture at top of post), it's really easy! Thread your needle and tie a good strong knot like last time, and from the inside of your book, thread the string through the centre hole that you made and pull it through until the knot catches. Okay so that part's done. Now pick a button, and sew it on to the cover like in the image on the top of this post. and there you have it! A button and string clasp.


Now go use it!


I hope you found this tutorial helpful.


And before you wander off....

Check out our facebook page...and like it!!
And have a squizz at our Pinterest...and maybe even follow us!
We sell pretty things on our Etsy...
And our Twitter is lots of fun!


God Bless!


Annabelle


<3


xxx